
Welcome to the IHAN Machine Embroidery Blog Hop, sponsored by Anita Goodesign. Before I begin, I want to wish our host for this event, Kelly Jackson (IHAN) a very Happy Birthday. I truly hope all her wishes come true!

This week eight bloggers will be sharing with you inspirational projects that they've created using designs by Anita Goodesign. Many will also be sharing tips, tutorials and hosting a giveaway. While this blog hop is definitely focused on Machine Embroidery, even if you do not have an embroidery machine, SewCalGal hopes you'll check it out. I think you'll find inspiration and tips that may also be of interest on other projects besides machine embroidery!
SewCalGal has two dates in this hop, today, as well as this coming Friday. I've got a lot to share, but I've decided to show you what I've created this coming Friday. I've also had major computer problems, machine problems, car problems, you name it problems. But, I'm sure you don't want to hear the details. As this post began to grow, I decided that I'd focus on sharing some tips and a simple tutorial with you today, as well as encourage everyone to visit all the blogs participating in this hop.
I know I'm certainly looking forward to it. And, I'll share with you insights on Friday, as to the fun I've been having with Anita Goodesigns.
Mon., March 18th
Kelly - I Have A NotionTues, March 19th
SewCalGal
Cindy - Sew CindyWed., March 20th
Trish - AllThingsCrafty.com
Marjorie's Quilting BeeThurs., March 21st
Margaret - The Average Quilter
Rebecca Grace - Cheeky CognoscentiFri., March 22nd
Gene Black - Alabama Artist
SewCalGal
TIPS
- Washaway Adhesive Stablizers are one of my favorites: There are all sorts of stablizers on the market, each with a purpose and many also benefit quilters, not just machine embroiderers. For example, there are quite a few washaway stablizers, some with a light adhesive backing. Small pieces of this type of stablizer can do wonders when you have a torn stablizer, or realize you should have used a heavier stablizer on your project. You can simply cut a piece the size you need, remove the paper from the adhesive backing and lay this stabilizer on top of your current layer of stablizer. I also prefer to use this form of stablizer on projects that I'm doing heavy Threadplay, or even Blanket Stitching, when I want to be sure the stablizer is 100% removed before I quilt it. While the instructions vary by Manufacturer, you can typically remove washaway stablizers by a light soaking in water and some with spritzing, following by pressing with a soft towel and letting it dry on a flat surface.
- Pre-Wash your fabric. Any shrinkage of your fabric will impact the results of your machine embroidery.
- Take time to plan out your machine embroidery project. Not all designs are appropriate for all types of fabrics. And, the type of stablizer you may want to vary based on the fabric in your project. You may want to plan out threads and line them up in the order you will be stitching. By doing a test stitch out on some scrap fabric, before you stitch out your project on your official fabric that you've chosen to use, you'll have a chance to easily change colors, or the order. I'll frequently do a test stitch out on an inexpensive tea towel, allowing me to change my color selection before I officially stitch out my project. And, frequently I end up with a cute embroidered tea towel that I can use at home, or for a gift.
- Placement: There is an art for placing designs on your project to get them lined up for where you want to stitch them out. Your design may come with a PDF that you can print, scaled to the size it will stitch out. There is frequently an x in the center, or cross lines across the design, that mark the center. You can mark your background fabric with a washaway pen, to mark the center, as well as mark cross hairs on this background fabric for how you want it to line up. Then, when you hoop your background fabric, line up the center in the hoop. And, before you start stitching out, verify the design will stitch out as appropriately. You can typically adjust placement within your machine using buttons to move up/down, left/right, or rotate. And, using the feature of telling your machine you have a broken thread, you can use your machine to advance forward and periodically drop your needle down to see where it will stitch. You can repeat these steps, while having your project in the hoop, to get perfect placement...and re-hoop, only as necessary!
- Read the specs on a machine embroidery design, before you purchase it, to understand if it will stitch out in the hoop sizes you may have for your machine. And, if the designs require multi-hooping that you understand how to do this, or are willing to learn. If not, you could purchase a design that you may not be able or comfortable to stitch out.
TUTORIAL - Multi-hooping
The larger your hoop size the easier it is for you to stitch out large designs, avoiding multi-hooping. But, not everyone has a large hoop. And sometimes a large hoop provides more space than you really need, thereby consuming more stablizer than you really need to do to efficiently stitch out a project!
The larger your hoop size the easier it is for you to stitch out large designs, avoiding multi-hooping. But, not everyone has a large hoop. And sometimes a large hoop provides more space than you really need, thereby consuming more stablizer than you really need to do to efficiently stitch out a project!
Let's think of doing a multi-hoop design using a shape depicted by this basic hexie. Many designs come ready to stitch out, just like this basic design. They stitch out the shape (and fill, etc).
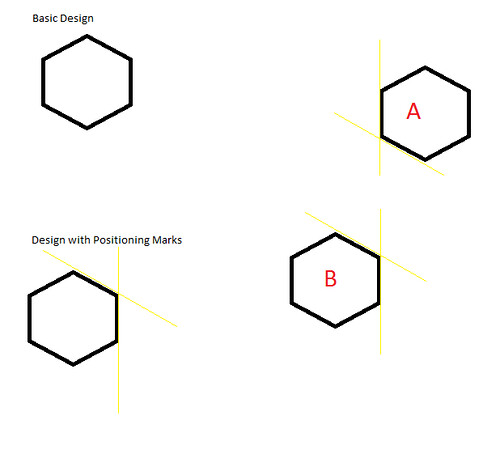
And many digitizers that plan out designs for multi-hooping will add in positioning marks, aka placement lines, that typically stitch out as a very light basting stitch that is easily removed.
To multi hoop, you would first stitch out design A. Re-hoop and before you stitch out B, you would use your machine to rotate the design and move it up to where the placement lines match up with A. This will most likely require you to use your up/down arrow on your machine, as well as your left right, and rotate arrow. Each machine is different, so I am not going to lengthen this post by going into all the details.
To verify your placement is correct, before you start stitching it out, remove the thread from your needle. Use the option on your machine for when you have a broken thread and manually scroll thru to find the start and end points of the yellow placement line. At each point manually drop your needle down to see if it lines up with the actual line in your hoop, when you stitched A. If not, repeat the steps to move your B design up/down, left/right/rotate, to better match the placement lines. Repeat with the manually dropping down and repeat this process, as appropriate, until you feel you have it lined up. Then, re-thread your needle and stitch out B. Make sense? It really is easy, but practice helps to build your confidence and skill at multi-hooping.
Again, I hope you'll visit all of the blogs in this hops this week. I think you'll be inspired with their projects, the quality and beauty of Anita Goodesigns, enjoy various tips, tutorials and, of course great giveaways too. And, don't forget to come back to SewCaGal on Friday as I'll share insights with you on what I've been working on and host a sponsored giveaway too!
And, if is an area of machine embroidery that you are looking for tips or a tutorial on, please feel free to leave a comment. While, SewCalGal is not an expert (at anything) I'll do my best to work with all the participants to see if it isn't covered during this blog hop, we'll see if one of us can help you out.

50 comments:
Wow!There is a lot to think about. I don't know anything about machine embroidery but now I have a little better understanding of how large the learning curve will be!Thanks for the tip on the stabilizers. I am just beginning to explore their possibilities.
Very interesting!!...This is something I don't do....but I have seen beautiful work.Thanks for sharing with us.
I love hand embroidery. Machine embroidery is just a future dream.
Wow love to learn. Thanks for the tutorial.
Judy
I've never done any machine embroidery, so I've much (very much) to learn!
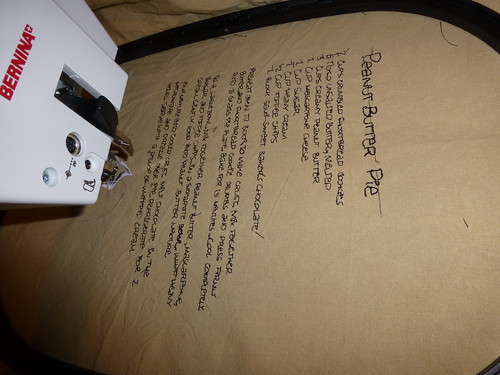
How FUN that you embroidered a recipe!! CLEVER!! I SHOULD do that with a pizza dough recipe I use every week- friday night pizza!! hmm where could I HANG that in my kitchen?? did you type it in EQ first or on the machine?
Great post and I know it will be helpful to all.
Thanks for the tutorial and tips. Don't know if I'm quite ready to try multihooping, but you make it look a little easier than I thought.
Good information and love that you can print it out to keep handy.
Rosemary
I am so glad to find your blog. I am fairly new at machine embroidery and need all the help I can get. Thanks for the tutorial. I have several projects that I want to do that will require Multi-hooping. Thanks to Anita Goodesign. Linda Z in TN
Hi. I have an embroidery machine and I am just learning to use it. Thank you for all the information. Now, I have a question for you. I have been using tearaway stablizer, but you talked about using washaway adhesive stablizers. Will this not gum up your needle and cause your threads to break? Thanks for any advice you can give.
Wow! This is a lot to take in!!! I've never done embroidery, period. I have always wanted to try but don't have an embroidery machine (or the money for one!)
This definitely inspires me to start embroidery though!
Thanks for sharing!
I am just getting into using my embroidery machine more not. Great timing for this blog hop. thanks
I'm so excited to start playing... I can't wait!!
Thanks for the handy tips!
This is one post I need to come back to again and again...such useful information, thanks!
Thanks for the tips! I have tried to multihoop and have just about given up on it. I am buying a bigger machine with a bigger hoop:) Ha ha! I win:)
I ove the idea of embroidering a recipe!
Thank you for the tips on multi hooping- still have not tried that!
You pointed out some really neat tips. Thanks for the learning curves.
My goodness what great tips and things to think about. I have been embroidering for a while and still find that there is so much to learn. I find too that its some times personal and or machine preference when stitching. Not all machines are alike .. I have a couple and they definately don't like the same threads when it comes to bobbin thread. I'm going to print this and put it in my tips binder!! Thanks
Thanks for the good tips. I am just getting back into my Machine Embroidery after not doing it for a while. These are excellent pointers and reviews for me!
Thanks for the tips you gave :-) Love machine embroidery
So sorry you have been having computer, car and machine problems! Hope all fixes are quick and easy.
Thank you for the tips! I am pretty new to machine embroidery and learning as I go. :-) Have a great day!
Bummer for all the troubles - seems like everything happens all at once, eh?
That's a *really* clever tip about removing the thread & giving it a go - I always try to test out the placement by putting the needle down, but, dang, I never thought to remove the thread & let 'er rip!
Thanks for all the tips. I have an embroidery machine, but I haven't used it enough to become competent. I hope to learn more tips this week.
Thanks for all the tips. I love my embroidery machine and am looking forward to reading all the posts on Anita's designs and picking up more and more ideas.
Thank you. I am just learning too, and find your tutorial very helpful.
Morning SewCaGal I can always depend on your sharing and teaching us something almost everyday...you are appreciated.
You make split designs and multi-hooping seem so much more doable than what most people believe. Love your tutorial and examples. Your tips on stabilizer are good for me too. I had not thought about using sticky stabilizer like that, but it's one I will use.
Thanks for the tutorial. I plan to use this soon on a new project.
Joanne
Thanks for the tips on multi hooping. I love my embroidery machine, but have avoided doing large designs that require multi hooping. You have inspired me to try one.
Great tips and something as simple as washing fabric is something I didn't think of when doing embroidery. I have a creative vision and still haven't used it to do embroidery and would love to use it for quilts that I could make for my family and charity quilts. I do have large hoops with mine.
Debbie
Love the tips! Thanks this is a keeper!
Great tips. Thanks for the info. I am just getting into using my embroidery machine, and am looking for ways to add embroidery to my quilting and sewing. Thanks for sharing
bonnielarson58@gmail.com
I love ME! Thank you for the good tips. I look forward to the remaining days of this blog hop.
I am amazed that your blog so often seems to reflect my learning curve! I have just started ME and am looking forward to this week!
I love blog hops! It is a great way to learn new things & get great tips. I keep a binder with all the tips I want to "remember"....my memory isn't the best anymore! Thank you for the great tips on multi hooping.
I have reposition my hop a time or two sometimes with good results, sometime not. My largest hop is a 5 x7" but I do have one of those repositional hops that I use for larger project. I dream that I will have the funds for a upgrade. Thank you for your wisdom in position hops.
I am thinking of purchasing a magnet hoop, thinking that would make rehooping easier. Need to get some practice in first though.
Great tips. Wish I had had all this information when I first got my embroidery machine 4 years ago. This is really gonna help the newbies.
Thanks for the tips! I love hand embroidery!
Excellent information and explanation for multi-hooping projects.
I've been very happy with every Anita Goodesign that I have used and after looking at everyone's projects in this hop, I now have a longer list of designs I want to use.
Thank you so much for all the work and effort you have put into this hop!
Smiles,
Kelly
great information, thanks SewCalGal
I have always been terrified to attempt any project that requires multiple hoopings where things need to line up properly, like tablecloth hems, borders, etc. I would love to see a more in-depth tutorial of how to add those reference lines and how to keep everything lined up correctly throughout multiple hoopings.
I love Anita Goodesigns, they always so out so nice. Thanks for the tips on machine embroidery
Great tips! Thanks
I have done a few double hooping designs. I still not real comfortable doing them and only do them when design is not dense. So far they have turned out ok . Thank you for your advice.
Thanks for al the helpful tips & info.....very good to know... 'specially for this embroidery machine beginner!!! Yay! :)
Thanks for this wonderful tips of embroidery, handling embroidery machine is kinda difficult to handle at first but in the long run we can do it perfectly. Practice makes perfect. :)
Thanks for the tips! They will come in handy. Always wanted to try the towel recipe designs!
Post a Comment